The beauty of C language is that it can go deeper at the hardware level, so you can optimise your hardware use and do more advance stuff with it.
The easiest way to learn low level programming on the Arduino is to switch off your Arduino IDE and jump straight into the raw C. And the easiest program to learn is to blink a LED built-in and connected to default pin 13, which is equivalent to PIN5 of PORT B (PB5) according to the datasheet.
You can use GUI editors like Atom or stick with terminal’s vim, and paste the following code listing.
#include <avr/io.h>
#include <util/delay.h>
#define BLINK_DELAY_MS 300
int main (void)
{
/* set pin 5 of PORTB for output*/
DDRB |= _BV(DDB5);while(1) {
/* set pin 5 high to turn led on */
PORTB |= _BV(PORTB5);
_delay_ms(BLINK_DELAY_MS);/* set pin 5 low to turn led off */
PORTB &= ~_BV(PORTB5);
_delay_ms(BLINK_DELAY_MS);
}
}
Now if you are familiar with C, you can compile it this way: gcc led.c -o led
But because this is a device specific code, you need to compile it this way usig an AVR compiler:
avr-gcc -Os -DF_CPU=16000000UL -mmcu=atmega328p -c -o led.o led.c
avr-gcc -mmcu=atmega328 led.o -o led
avr-objcopy -O ihex -R .eeprom led led.hex
If it compiles well, then you can upload it to your Arduino Uno which is attached to the serial por /dev/ttyUSB0 via USB cable.
The following will erase the current content of the board’s flash memory and replace it with the led.hex bytecodes.
avrdude -F -V -c arduino -p m328p -P /dev/ttyUSB0 -b 115200 -U flash:w:led.hex
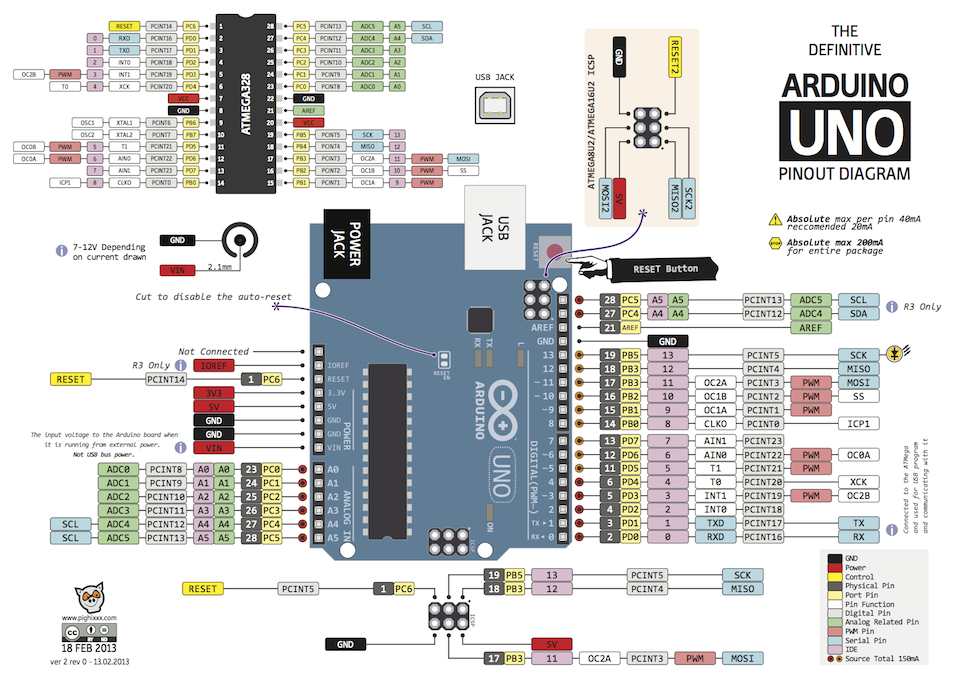
You can replace the board identifier depending upon the type of your Arduino. Please see the following diagram for your port and pin reference:
To make your life easier, you can create a Makefile to list down the above comments and semi-automate the compile-flash process. Good luck! Any error, please leave comment below.
 with Python 3, OpenCV 3, Pi Camera, and Raspberry Pi 2")

