So we have all the backbone software ready as discussed in Part 2, now we want to create the interface. We basically need JQuery to handle the button interaction. Once a button is clicked, it will send a command to the server via WebSocket. The server needs to relay the messages to python files where all the servo controls sit.
The following code should be saved in a file called tornado_client.html.
<!doctype html>
<html>
<head> <title>Tornado Servo Controller</title>
<meta charset="utf-8" />
<style type="text/css">
body { text-align: center; min-width: 500px; }
</style>
<script src="http://code.jquery.com/jquery.min.js"></script>
<script>
$(document).ready(function () {
 var ws;
 var is_open = false;

 openWebSocket();
 function openWebSocket(){
  $("#host").val(window.location.hostname);
  var host = $("#host").val();
  var port = $("#port").val();
  var uri = $("#uri").val();
  //host = "localhost"
  ws = new WebSocket("ws://" + host + ":" + port + uri);
 }

 function checkActions(){
  ws.onmessage = function(evt) {
   $("#messageContainer").html(evt.data);
  };

  ws.onclose = function(evt) {
   $("#open").val("Open");
   is_open = false;
   $("#host").css("background", "#ff0000");
   $("#port").css("background", "#ff0000");
   $("#uri").css("background", "#ff0000");
   $('#up').prop('disabled', true);
   $('#down').prop('disabled', true);
  };

  ws.onopen = function(evt) {
   is_open = true;
   $("#host").css("background", "#00ff00");
   $("#port").css("background", "#00ff00");
   $("#uri").css("background", "#00ff00");
   $("#messageContainer").html("");
   $("#open").val("Close");
   $('#up').prop('disabled', false);
   $('#down').prop('disabled', false);
  };
  move=false;
 }

 $("#up").click(function(evt){
  if(!is_open){
   $("#messageContainer").html("Socket is closed. Please open first");
   return;
  }
  ws.send("up");
  ws.onmessage = function (evt) {
   var received_msg = evt.data;
   if(is_open) $("#messageContainer").html(received_msg);
  };
  ws.onclose = function(evt) {
   $("#messageContainer").html("Disconnected! Goodbye!");
   is_open=false; checkActions();
  };
 });

 $("#down").click(function(evt){
  if(!is_open){
   $("#messageContainer").html("Connect the port first");
   return;
  }
  ws.send("down");
  ws.onmessage = function (evt) {
   var received_msg = evt.data;
   if(is_open) $("#messageContainer").html(evt.data);
  };
  ws.onclose = function(evt) {
   $("#messageContainer").html("Disconnected! Goodbye!");
  };
 });

 $("#open").click(function(evt) {
  evt.preventDefault();
  //host = "localhost"
  if($("#open").val()=="Open"){
   alert("Opening")
   openWebSocket();
  }else{
   ws.close();
   move=false;
  }

 });
});
</script>
</head>
<body>
<h1>Tornado Servo Control</h1>
<div>
 <label for="host">host:</label>
 <input type="text" id="host" value="localhost" style="background:#ff0000;"/>
 <label for="port">port:</label>
 <input type="text" id="port" value="8888" style="background:#ff0000;"/>
 <label for="uri">uri:</label>
 <input type="text" id="uri" value="/ws" style="background:#ff0000;"/>
 <input type="submit" id="open" value="Open" /><br>
 <input type="button" id="up" value="up" />
 <input type="button" id="down" value="down" /> <br>
</div>
<div="textarea" id="messageContainer"/></div>
</body>
</html>
Run the server with the following command: sudo python3 TornadoServer.py.
Once the server is running you can access the file from your laptop client browser, like this: http://192.168.0.102:8888 (the IP address depends on the address of Raspberry Pi)
With few more modifications you will be able to get something similar to this:
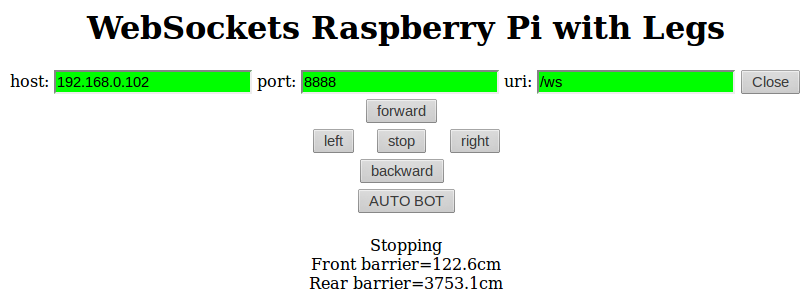
Look at how awesome all these code come alive in this robot.
If you get lost, you can always refer to Tornados’s official documentation which we find difficult to understand for beginner. But with additional examples available online and endless nights of experimentations you will get your robot moving eventually.
")

