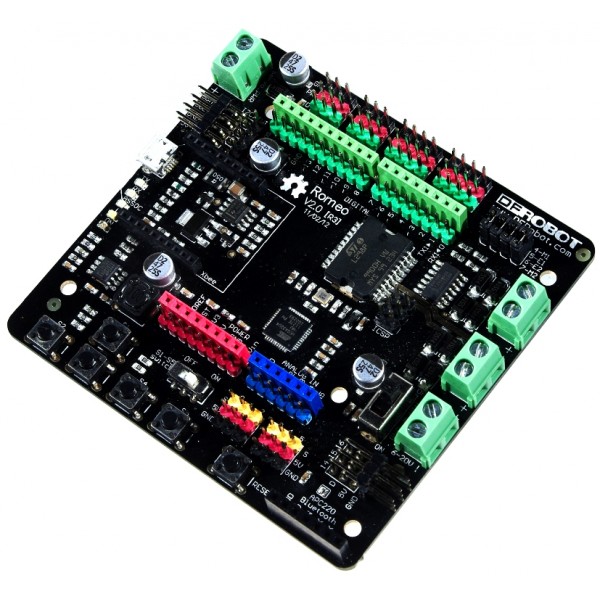
Romeo V2 All in One Controller is an independent motor controller that can run without any PC. We can program the 5 buttons with scripts from Arduino IDE, or we can use the miniUSB port to communicate with a Raspberry Pi.
This board can control 2 motor channels, and several channels for servo.
The official manual / wiki claimed that there are are 7 PWM pins. But when we tested only 3, 5, 6, 11, 13 pins work. Pin 9 and 10 somehow cannot dimm the LED when we sent the analog signal to it. So the best set up for this is to use pin 5 and 6 to control the speed of the 2 motor ports, and use the 3 other pins for additional things like that require PWM analog input such as the LED dimmer.
Power can be supplied from USB port or battery inlet. A simple 4 motors platform like DFRobot 4WD Mobile Platform is the most suitable and perfect host for the Romeo board. Here are the codes to control the above motor controller. Just copy and paste into Arduino IDE, and select Arduino Leonardo board and the appropriate serial port, before compiling and uploading the script onto the board.
char msgs[5][15] = {
“Up Key OK “,
“Left Key OK “,
“Down Key OK “,
“Right Key OK “,
“Select Key OK” };
char start_msg[15] = {
“Start loop “};
int adc_key_val[5] ={
30, 150, 360, 535, 760 };
int NUM_KEYS = 5;
int adc_key_in;
int key=-1;
int oldkey=-1;
//Standard PWM DC control
int E1 = 5; //M1 Speed Control
int E2 = 6; //M2 Speed Control
int M1 = 4; //M1 Direction Control
int M2 = 7; //M1 Direction Control
///For previous Romeo, please use these pins.
//int E1 = 6; //M1 Speed Control
//int E2 = 9; //M2 Speed Control
//int M1 = 7; //M1 Direction Control
//int M2 = 8; //M1 Direction Control
void stop(void) //Stop
{
digitalWrite(E1,LOW);
digitalWrite(E2,LOW);
}
void advance(char a,char b) //Move forward
{
analogWrite (E1,a); //PWM Speed Control
digitalWrite(M1,LOW);
analogWrite (E2,b);
digitalWrite(M2,LOW);
}
void back_off (char a,char b) //Move backward
{
analogWrite (E1,a);
digitalWrite(M1,HIGH);
analogWrite (E2,b);
digitalWrite(M2,HIGH);
}
void turn_L (char a,char b) //Turn Left
{
analogWrite (E1,a);
digitalWrite(M1,LOW);
analogWrite (E2,b);
digitalWrite(M2,LOW);
}
void turn_R (char a,char b) //Turn Right
{
analogWrite (E1,a);
digitalWrite(M1,LOW);
analogWrite (E2,b);
digitalWrite(M2,LOW);
}
void setup(void)
{
int i;
pinMode(13, OUTPUT); //we’ll use the debug LED to output a heartbeat
for(i=4;i<=7;i++)
pinMode(i, OUTPUT);
Serial.begin(19200); //Set Baud Rate
Serial.println(“Run keyboard control”);
}
void loop()
{
adc_key_in = analogRead(A0); // read the value from the sensor
digitalWrite(13, HIGH);
/* get the key */
key = get_key(adc_key_in); // convert into key press
if (key != oldkey) { // if keypress is detected
delay(50); // wait for debounce time
adc_key_in = analogRead(A0); // read the value from the sensor
key = get_key(adc_key_in); // convert into key press
if (key != oldkey) {
oldkey = key;
if (key >=0){
Serial.println(adc_key_in, DEC);
Serial.println(msgs[key]);
Serial.println(key);
}
}
int val2 =key;
if(val2 != -1)
{
switch(val2)
{
case 0://Move Forward
advance (155,155); //move forward in max speed
break;
case 2://Move Backward
back_off (155,155); //move back in max speed
break;
case 1://Turn Left
turn_L (50,200);
break;
case 3://Turn Right
turn_R (200,50);
break;
case 4:
stop();
break;
}
}
else stop();
}
if(Serial.available()){
char val = Serial.read();
if(val != -1)
{
switch(val)
{
case ‘w’://Move Forward
advance (155,155); //move forward in max speed
break;
case ‘s’://Move Backward
back_off (155,155); //move back in max speed
break;
case ‘a’://Turn Left
turn_L (50,200);
break;
case ‘d’://Turn Right
turn_R (200,50);
break;
case ‘z’:
Serial.println(“Hello”);
break;
case ‘x’:
stop();
break;
}
}
else stop();
}
digitalWrite(13, LOW);
}
// Convert ADC value to key number
int get_key(unsigned int input)
{
int k;
for (k = 0; k < NUM_KEYS; k++)
{
if (input <= adc_key_val[k])
{
return k;
}
}
if (k >= NUM_KEYS)
k = -1; // No valid key pressed
return k;
}

DFRobot 4WD Mobile Platform – The right choice for DFRobot Romeo
Make sure you have the latest Arduino IDE from the following website: http://arduino.cc/en/Main/Software
[post_view]
2 thoughts on “Arduino codes for DFRobot Romeo v2 to control motors via keyboard and S1-5 buttons”
Comments are closed.

 with Python 3, OpenCV 3, Pi Camera, and Raspberry Pi 2")

why can’t I verify it?
Did you just copy and pasted or retype the whole code?
Sometimes the characther encoding for the single and double quote signs that surround the strings dont get intrepreted correctly. Make sure your quote signs are valid.